|
|
#1 |
|
Senior Member
|
Replace your horn with a 139dB Stebel Nautilus Air Horn
http://www.bikerhiway.com/index.php?...products_id=74
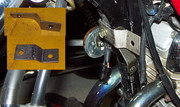
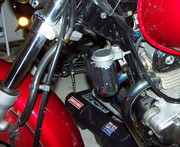
with coupon code for free shipping: MG610611 They include the relay, fuse and most wiring. The only additional things required were: - 2 small pieces of wire - 2 crimp on male blade connectors - assorted zip ties. Tools required: drill vice and hammer or other means of bending mounting bracket crimping tool for cutting wire and crimp on connectors. wrenches or sockets for nuts/bolts. I don't remember what sizes. Step 1 Mounting:  - I used a scrap piece of 11 gauge stainless, but any scrap of sheet metal will do. - Drill the 2 holes as shown. - I used a vice an a hammer to beat it into a shape with a slight twist. This is necessary as the horn pump needs to be as close to vertical as possible. - Temporarily remove the side reflector until the mounting is completed. Step 2 Wiring: Wiring is pretty simple. I used all crimp connectors and had to do no wire cutting or soldering. DO NOT think for a second that you can simply use the existing wires to power the air horn. You will be replacing your horn switch if you try. The air horn draws several times more current than the horn switch can handle. The proper way to wire the air horn is to use the horn switch to activate a relay that switches the power to the horn directly from the battery. For those who don't know, a relay is essentially an electrically operated switch. The relay can easily handle the current that the air horn draws. Now that that's out of the way, here's how to do it: - Remove the seat, gas tank and side "pods". See the service manual if you don't know how.  - Reroute the factory horn wire harness toward the back of the bike as shown in the picture. Use zip ties as necessary. - Cut two pieces of wire the same length (I used some 16 ga lamp cord I had laying around.) that will reach from the wire harness to approximately the under seat storage area. - Crimp on a male blade connector to one end of each wire. - Insert the male blade connectors into the wiring harness and secure with electrical tape or with zip ties as shown.  - Locate the relay above the air box as shown. (do not zip tie to frame until after you're done wiring. It is easier that way) - Trim the length on the 2 wires that you inserted into the factory horn wire harness so that they reach the relay's location - Crimp on female blade connectors supplied in the kit and attach to the relay terminals. These are the white wires in the picture. These are the two opposing terminals that are parallel. These are the terminals that supply power to the relay to "switch" it. It does not matter which one is plus and which one is minus. The other two opposing terminals that are perpendicular are the two terminals that are switched. The battery will go to one side and the + wire to the horn on the other side. Again it makes no differnece which one of these two terminals the battery and horn are connected to. The installation manual does a good job of explaining this. If you are still confused feel free to ask questions.  - Hook the included fuse to the + battery terminal. For safety take the fuse out of the fuse holder so that you don't accidentally touch the frame with the other end of the wire. - Crimp on Female blade connector to the other end of the fuse holder wire and connect to the relay as described above. - With the included wire, following installation manual, crimp on 2 female blade connectors to a wire and route from the remaining relay terminal along the frame under the gas tank and connect to the + terminal on the horn. - Take a black piece of wire from the kit and crimp a female blade connector on one end. - Connect this to the - terminal on the air horn and secure the other end of the wire to any convenient frame bolt. - Zip tie relay to frame. Step 3 Test your wiring: Now that you're almost done. It's time to test your wiring to see if you've done it right. - Leave the fuse out of the fuse holder and turn your ignition key to "on" - Press the horn button - You should here the relay make a "tick" sound. If you don't recheck your wiring. - If you hear the "tick" sound, insert the fuse and test the horn. - You really don't want to do this in a garage. 139 dB is VERY LOUD!!! Put your bike back together and be safer with a horn those cages will actually hear. (I forgot to put the side reflector back on before taking this pic.) 
Login or Register to Remove Ads Last edited by Quimrider; 10-03-2020 at 12:48 AM. Reason: Updated Image Links |
|
|

|
|
|
#2 |
|
Super Moderator
Join Date: Jan 2007
Location: Dalton, GA
Posts: 3,996
|
Looks pretty good, Quim.
Thanks for the write-up. |
|
|

|
|
|
#3 |
|
Senior Member
Join Date: Jan 2007
Posts: 184
|
I have one and can testify they are loud. I had a dump truck loaded with gravel cut me off on the interstate; the driver heard my horn over his diesel dump trunk. I could see him in his mirrors trying to find the sound :-). He was trying to find a semi or other huge truck when he realized I was honking the horn.
Login or Register to Remove Ads |
|
|

|
|
|
#4 |
|
Senior Member
Join Date: Jan 2007
Posts: 184
|
When i installed mine, I didnt drill any holes. I found a two inch bracket in my garage (two inch piece of metal with proper holes on each end). I removed the stock horn. Attached one end of the bracket in place of the stock horn, then mounted my steubel to the other end.
I attached my relay behind the right side reflector (I removed the nut holding the reflector, the bolt was long enough to add the relay and reattach the nut). I used the existing horn wires to connect to the relay switch, connected the other wires to the horn, connected the ground wire (used existing bolt on top of forks), ran a hot wire to the battery and bingo. Basically same as Quimrider but I didnt run existing horn harness/wires to the back of the back (airbox area). If I can get the camera from the wife, and I dont forget, i will take pictures of my setup and add them this weekend. |
|
|

|
 |
|
|