|
|
#1 |
|
Senior Member
Join Date: Jul 2007
Location: Spain
Posts: 102
|
GZ250 power increase.
This is a translation of my how-to published in the spanish GZ250 forum. My English is not perfect, so maybe there some wrong words... :blush:
I'm simplifying it too, so it's easier for me to translate. We're going to increase the power output of the Suzuki GZ250 "Marauder", with small and cheap mods in intake, carburettor and exhaust. This is a mid-hard how-to. I haven't checked my bike in a dyno, but the max speed in a certain track has been increased from 78 mph to 81-84 mph; for Stage 1, and over 87 mph; for Stage 2. The first thing is to get a higher flow air filter. You can:
Once modified or replaced, the bike will run so bad. That means that it has a good empowering potential. I've replaced the exhaust can too (Stage 2) but it's not needed. Let's carburate it. STAGE 1 Air filter modded Carburetting a vehicle is not easy, it's more like an art, so your results may differ of mine. It's about checking and correcting. There are 3 systems: low-speed, mid and main, having influence on low to high rpm, respectively. Our bike is equiped with a Mikuni BSR32SS. 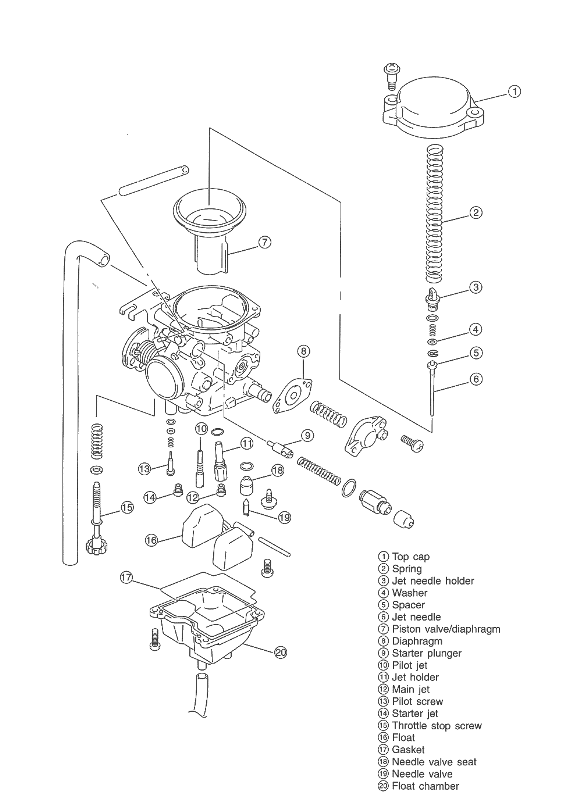 The low-speed fuel system is controlled by the pilot jet and the pilot screw, the mid-speed by the jet needle and needle jet (less important), and the main fuel system basically depends of the main jet. There are other parts involved, but I'm not modifying them. 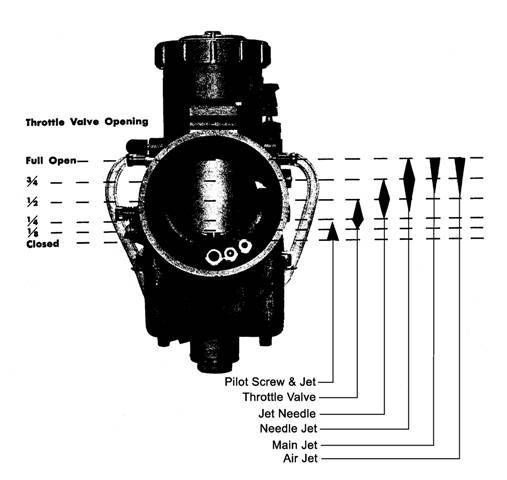 The following chart shows the config of my carburettor (spanish GZ250K6): 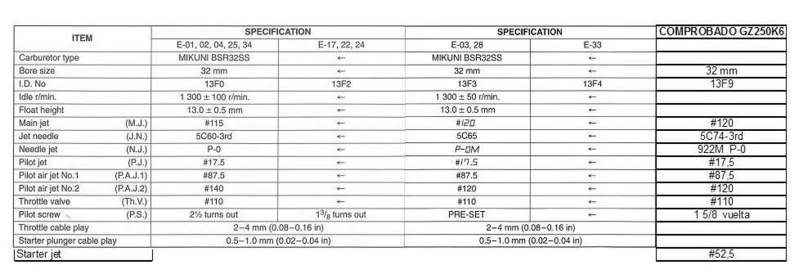 The best config of my bike once recarburated is the following: STAGE 1: - Main jet #145 - Jet needle at 5th slot (richest) - Pilot screw at 1.75-2 turns out STAGE 2: - Main jet #150 - Jet needle at 7th slot (virtual, see "STAGE 2" for details) - Pilot screw at 2.25 turns out The main jet is a Mikuni type N102/221 (N102.221). I've bought some through eBay. We'll need some different measures around the ones told above. Also, you have to consider your climate, height over sea level, etc. Let's see the process. Carburate your bike in the following order:
1. Main fuel system To access the jets, proceed this way:
2. Mid-speed fuel system It's harder than main fuel system. You have to modify the height of the jet needle and check the acceleration after every change; a tedious work.
3. Low-speed fuel system Locate the pilot screw and adjust it. Maybe you have to drill a cap to access it. European GZs have direct access to this screw: 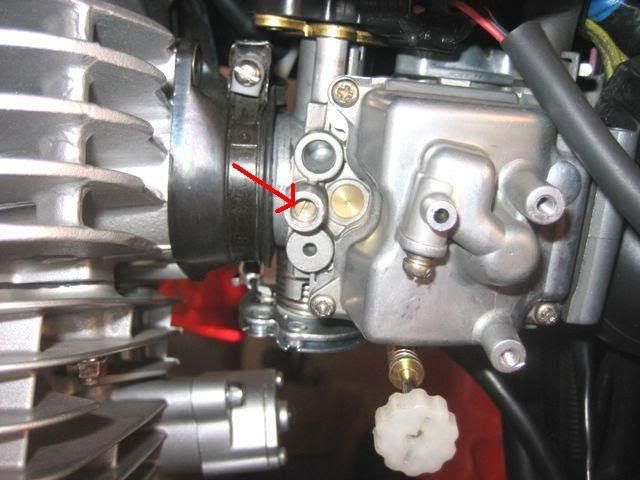 Count the turns clockwise to get it seated and leave it stock again. You have to adjust this system with the bike turned on, at a normal function temperature and idling (idle shouldn't be too high or too low). Turn counterclockwise the pilot screw by 1/4 turns every time, waiting a few seconds to see the effect. You must find the point where the rpm maxes. If it's reached between 2 and 3 turns out, it'll be better for performance setting it near 3 turns out (around 2.75 will be ok). Once adjusted, turn the throttle suddenly up to 1/3 in neutral from idle, then release it.
STAGE 2 Air filter mod and exhaust can replaced Same process, bigger main jet (about 2 sizes in my case; 145->150). I had to cut the jet needle head at the first notch, as it was too long after the needle shim. It was shimed to emulate a 7th notch, needed for a good adjustment. 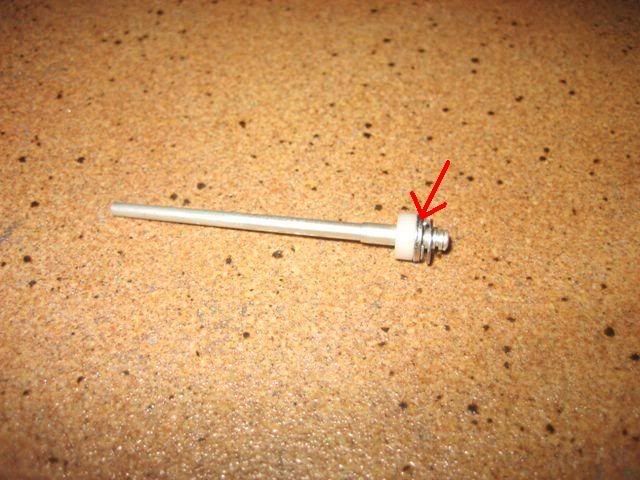 The exhaust mod makes is noticeable at low and mid rpm, not that much at higher rpm (that's what I feel). Well, I hope this how-to helps. If you have any doubt, problem, suggestion or correction, don't hesitate to post a message.  Sorry again about my English.
__________________
 Trying my best in English Trying my best in English
Login or Register to Remove Ads |
|
|

|
|
|
#2 |
|
Senior Member
|
Very nice and thorough write up and translation. Thanks Jaime.
|
|
|

|
|
|
#4 |
|
Super Moderator
Join Date: Jan 2007
Location: Dalton, GA
Posts: 3,996
|
That's Friggin's awesome! I knew Su-5589 would work. I'm glad someone finally verified it. :rawk:
|
|
|

|
|
|
#5 |
|
Senior Member
Join Date: May 2007
Location: toronto ont canada
Posts: 177
|
Thanks for the how-to .
I am familiar with rebuilding carbs but the older styles do not have a diaphram . the carb on my honda 200cc has both an idle screw and a mixture screw. turning the mixture screw out richens the mix . what is the equilvalent screw for the gz250 carb ? I wonder if adjusting mixture is the 1 st modification that should be made. I have in the past used a larger main jet with mixture adjustments to compensate for unrestrited air flow and less restricted exhaust on a honda with noticeable performance improvement. Re: exhaust : less restrictive exhaust also has less back pressure which may result in shortened valve life or burned piston crowns. ( did that in the past )
__________________
sds4 Login or Register to Remove Ads |
|
|

|
|
|
#6 |
|
Senior Member
Join Date: Jul 2007
Location: Spain
Posts: 102
|
Sorry, Trykemike. I haven't read this topic for months... :oops:
The equivalent to the mixture screw is the "pilot screw", #13 in the diagram. It enrichens the mixture when turning it out too. When it's located in the air filter side, it usually enrichens when turning in. The first thing to do is choosing the proper main jet, as it causes the biggest impact on the mixture. The needle jet isn't used to be changed much, but in the GZ250 it's a need. The mixture screw, on the other hand, only affects the first 1/3 of throttle range. The increase in performance is noticeable, but not astonishing. Anyway, I've "raced" a stock GZ250 and mine blowed it away, I had to wait for him at tiny throttle.
__________________
 Trying my best in English Trying my best in English
|
|
|

|
|
|
#7 |
|
Senior Member
Join Date: May 2007
Location: toronto ont canada
Posts: 177
|
power increase
Thanks Jamie.
__________________
sds4 |
|
|

|
|
|
#8 |
|
Senior Member
|
Thanks Jamie! btw your english is as good if not better than most english speaking people. Obviously if you're using the extra available power to accelerate quicker and drive at 80+mph it's going to drop your fuel economy. Other than that, have you noticed any change in fuel economy before / after the modification?
|
|
|

|
|
|
#9 |
|
Senior Member
Join Date: Jul 2007
Location: Spain
Posts: 102
|
Thanks, Quimrider.
The fuel economy of the stock bike was around 61 mpg. It's true that now I cruise at quite higher speeds, and the fuel economy has dropped to 54 mpg.
__________________
 Trying my best in English Trying my best in English
|
|
|

|
|
|
#10 |
|
Senior Member
Join Date: May 2007
Location: toronto ont canada
Posts: 177
|
main jet change
Jamie I have noticed that when I apply a slight bit of choke @7000 rpm in 5 th gear then back off on throttle I get to 7500 + so I concluded that the mixture was a slight bit lean . I have a 125 main jet but before installing it I wanted to ask if it would make the mix too rich. I have a drilled exhaust and stock air cleaner.
I don't plan on riding consistently at speed above 6000 rpm ( 5000 - 5500 rpm ) but am experimenting. I want reliability.
__________________
sds4 |
|
|

|
 |
|
|